How Do I Update My WordPress Website
Article
Want To Excel on the Web?
Updating your WordPress site might seem daunting, and it’s not uncommon to find that many users are still running on older versions. Despite WordPress’s consistent nudges towards the latest updates, a surprising number of users need to catch up, with only a little over half embracing the most recent release.
So, what makes updating WordPress a hurdle for many?
The process isn’t just about clicking an update button. It involves carefully upgrading the WordPress Core and various plugins and themes.
Moreover, there’s a lingering fear among users about updates potentially causing website crashes or functionality issues, which partly explains the hesitation.
Yet, the significance of these updates cannot be overstated because outdated WordPress versions become easy targets for hackers. Regular updates are your first line of defense, patching up vulnerabilities and fortifying your site’s security.
But it’s not all about defense. Updates give you new features and enhanced compatibility, all available at no extra cost. This article delves into the challenges of WordPress updates and offers practical, efficient strategies for a successful and hassle-free update process.
- Why Do I Need to Keep WordPress Updated?
- What Are the Risks of Not Updating?
- Backing Up Your Website
- Checking Compatibility
- Updating WordPress Automatically
- Manual Update for Advanced Users
- How to Update WordPress Plugins
- How to Update WordPress Themes
- How do I fix my WordPress website when it’s stuck in maintenance mode?
- How do I fix my WordPress website if an update won’t finish?
- How do I fix WordPress’s “white screen of death”?
- If All Else Fails, Restore from Your Backup
Updating WordPress
Why Do I Need to Keep WordPress Updated?
Most discussions around WordPress updates focus on security and bug fixes; business owners need to stay in sync with current web standards and user expectations. Each update patches vulnerabilities and aligns your website with the latest standards and design trends. Keeping up with trends is vital for maintaining a competitive edge.
For instance, recent WordPress updates have emphasized mobile optimization and faster loading times, directly impacting your site’s SEO rankings and user engagement. As search engines evolve, they favor secure, user-friendly, and fast-loading websites. Keeping WordPress updated ensures that your site adheres to these ever-changing standards, which can be a game-changer in how your business is perceived online.
What Are the Risks of Not Updating?
The risks of not updating WordPress extend beyond the obvious security threats. One of the less discussed consequences is that, over time, your website will no longer work with modern web browsers. As the internet evolves, so do the tools and technologies that power it. An outdated WordPress site may not function correctly with the latest browsers, plugins, or third-party integrations, leading to a subpar user experience or even total inaccessibility for some users.
Ignoring updates can cause future updates to be more complex and risky, leading to higher costs and longer downtime, so a regular update schedule is recommended.
Preparing for the Update
When it comes to updating your WordPress site, preparation is key. This step is often glossed over in standard guides. Still, it’s crucial for a smooth, risk-free update process, especially for business websites where downtime can mean lost revenue and damaged reputation.
Backing Up Your Website
Before any update, backing up your website is non-negotiable. However, more than a mere backup is needed. It would be best if you had a comprehensive backup strategy. This involves backing up your site’s content and database and understanding where and how your backups are stored. Are they on the cloud, an external hard drive, or both? How quickly can you retrieve them in case of an emergency? Ensure your backup process is robust and tested – a backup you can’t restore is as good as no backup. Every host has a different process for handling backups, so be sure to check with your host on how to back up your website best.
Checking Compatibility
Most guides will tell you to check if your themes and plugins are compatible with the new WordPress version. But let’s delve deeper. It’s not just about compatibility; it’s about preparedness. For each plugin and theme, check the developer’s notes for any specific instructions related to the update. Are there any features that will be deprecated? Is there a new setting you’ll need to configure post-update?
Moreover, consider the broader ecosystem of your website. How does your site interact with external services and APIs? For instance, if you’re using a CRM or an e-commerce platform, ensure these integrations will continue working seamlessly post-update. This step is often overlooked but critical for businesses relying on these integrations for their day-to-day operations.
Preparing for a WordPress update is more than just hitting the ‘update’ button. You must safeguard your website and ensure a seamless transition to the latest version, keeping your business running smoothly and your online presence robust.
The Update Process
Updating WordPress Automatically
The automatic update is a user-friendly method suitable for all WordPress users, streamlining the upgrade process with minimal effort.
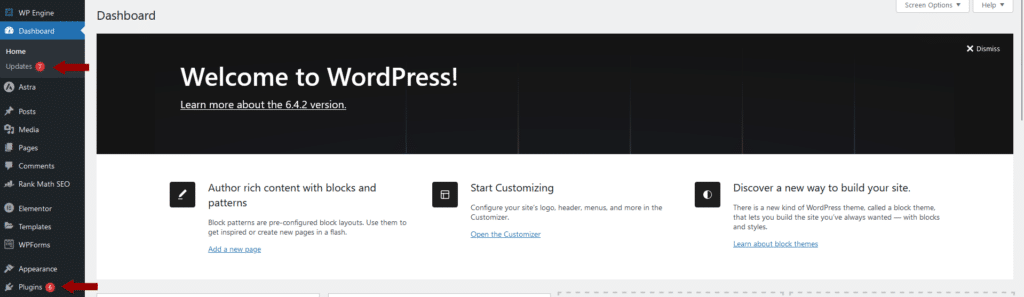
Begin by logging into your WordPress website’s admin area. Once there, navigate to the dashboard and select the ‘Updates’ section. Here, you’ll be notified if a new WordPress version is available. Click the ‘Update to version X.X.X’ button to start the upgrade process.
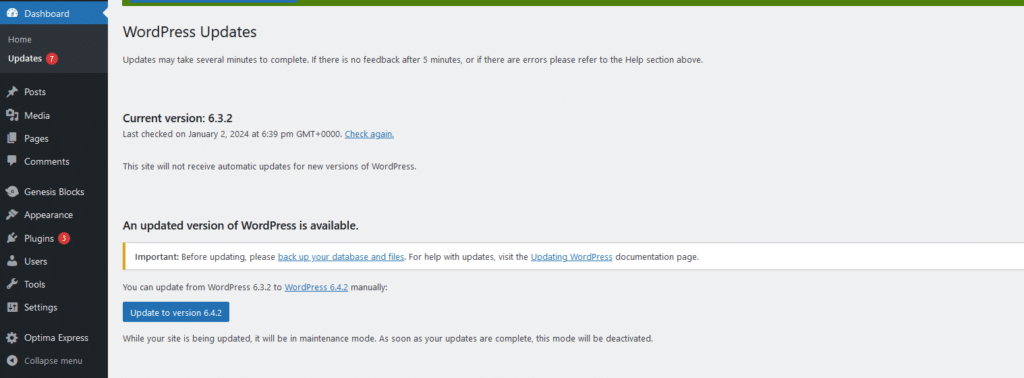
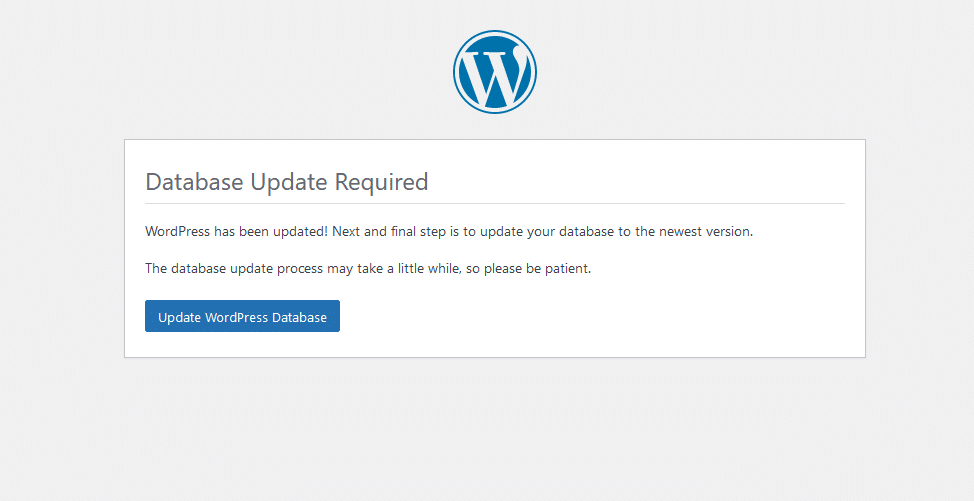
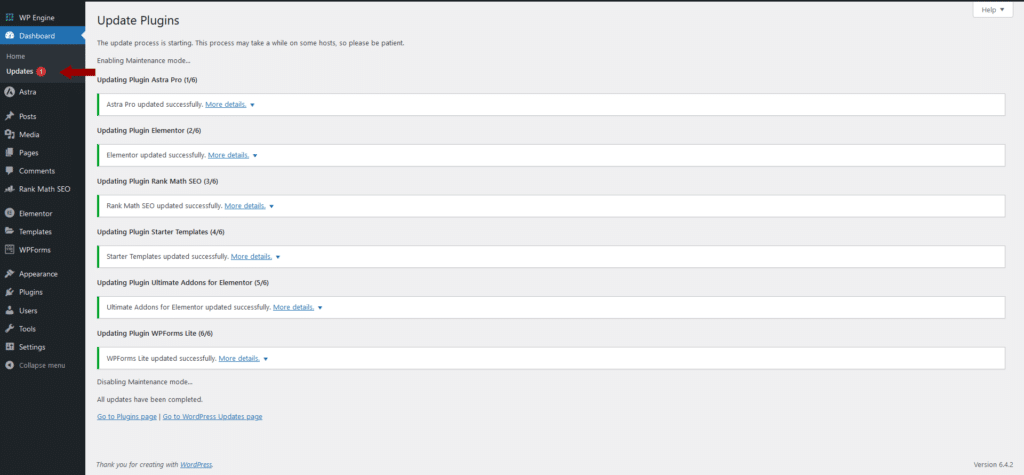
WordPress will then proceed to download and install the latest version for you. An update progress bar will be displayed on your screen during this process. It’s important to note that WordPress will switch your site to maintenance mode while the update is happening. While your website remains visible to visitors, functionalities such as installing new plugins or themes will be temporarily disabled.
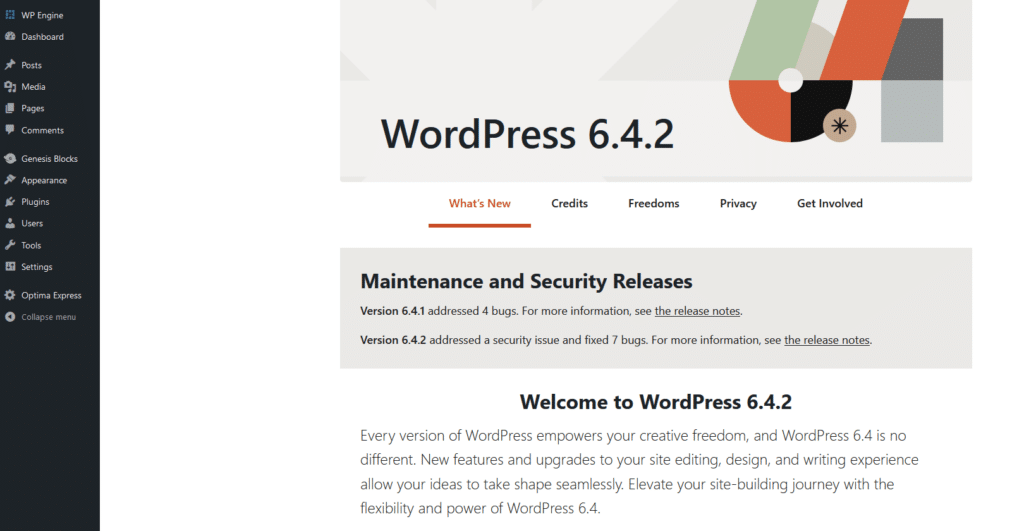
After the update, WordPress will automatically remove your site from maintenance mode. You’ll then be taken to the WordPress welcome screen, which often includes a summary of what’s new in the latest version and suggestions on features to explore.
Manual Update for Advanced Users
The manual update method is a more hands-on approach, ideal for users who prefer greater control over the update process or when the automatic update isn’t feasible.
Start by downloading the latest WordPress version. Visit the WordPress download page and click the ‘Download’ button to get the latest version in a zip file.

After downloading, extract the zip file, which reveals a folder named ‘WordPress.’ This folder contains all the necessary WordPress files for your update.
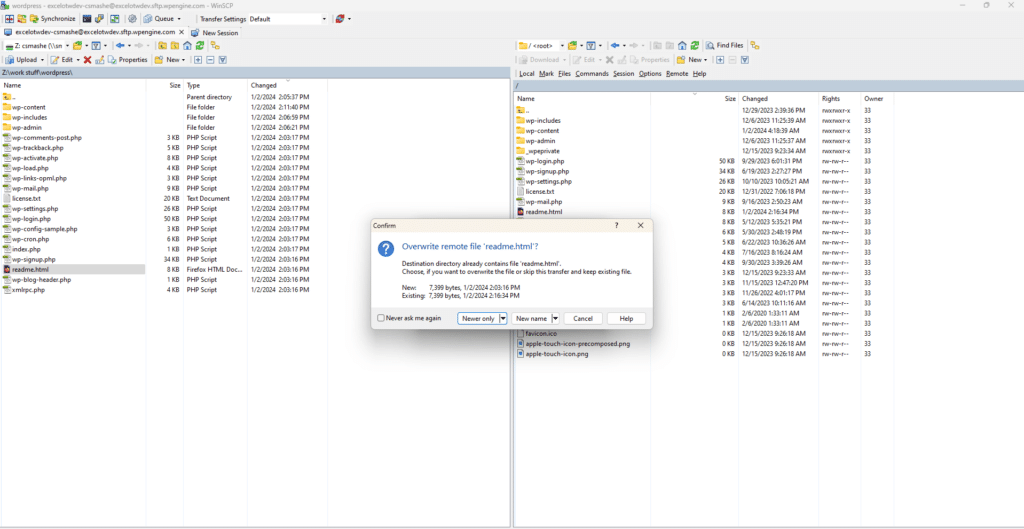
Next, open your FTP client and connect to your website. In the FTP client’s local files column, locate the ‘WordPress’ folder you just extracted. Then, in the remote files column, navigate to your website’s root folder, which is typically named public_html or after your domain.
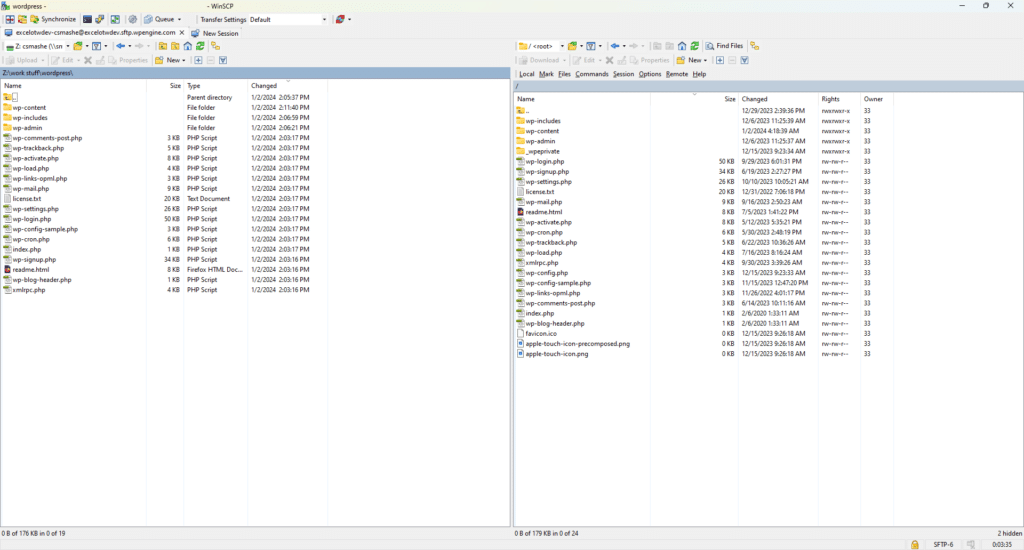
Select all files in the local ‘WordPress’ folder and right-click to choose ‘Upload.’ The FTP client will transfer the new WordPress files from your computer to your website server.
You’ll encounter files on your website with the same names as the new ones during this process. When prompted, choose ‘Overwrite’ and ‘Always use this action.’ This ensures that all old WordPress files on your website are replaced with the new versions.
Post-Update Actions
How to Update WordPress Plugins
Updating your WordPress plugins is a key step in maintaining your site’s functionality and security post-update. This process involves more than just applying updates; it’s about managing them to ensure your site remains stable and efficient.
When you log into your WordPress dashboard, you likely notice update notifications for your plugins. These are typically indicated by a red circle and a number on the side toolbar, showing how many updates are pending.
It’s crucial to monitor your site’s performance during this process. After the updates are applied, visit your live site to ensure everything functions as expected. Check for any errors or disruptions in site performance. Confirming that the updates have integrated seamlessly with your site is important.
Finally, return to your dashboard and click on the update icon again. You should see the number next to the icon decrease, corresponding to the number of plugins you’ve updated. This indicates a successful update process.
How to Update WordPress Themes
Updating the theme of your WordPress site is an essential step in ensuring that your site’s design and functionality align with the latest standards. This process, while similar to plugin updates, requires its own set of careful considerations.
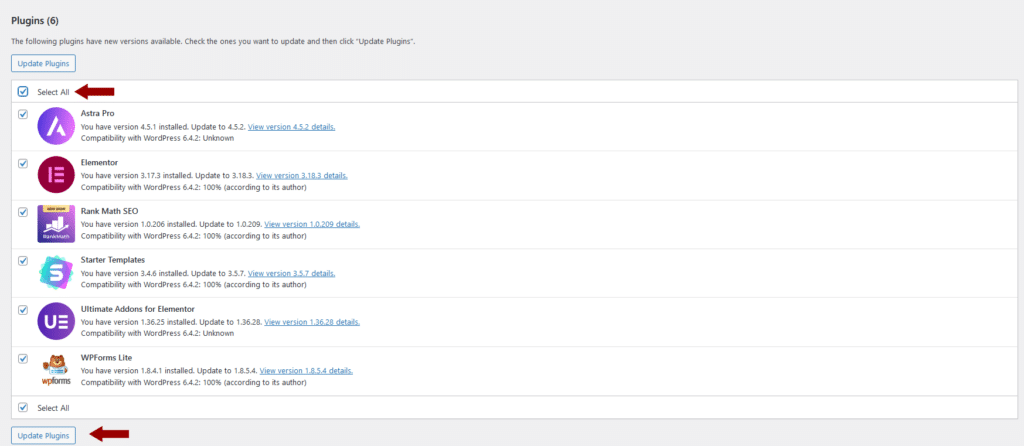
To start updating your theme, navigate to the updates page in your WordPress dashboard. Here, you’ll find a section dedicated to themes. Look for the theme you wish to update, click on the corresponding box, and then select “Update Themes.” This will initiate the update process, which is straightforward and similar to updating plugins.

After the update is complete, make sure you review your site. Ensure the update has kept all visual elements and functionalities intact. If you encounter any issues, you can revert to your backup version, restoring your site to its state before the update.
Whenever you have a problem with a theme update, you should contact the developer. Please provide them with details about the specific errors or issues you encountered. Their guidance can be invaluable in resolving any conflicts or problems resulting from the update.
Troubleshooting Common Issues
How Do I Fix My WordPress Website When it's Stuck in Maintenance Mode?
When a WordPress update doesn’t complete, it can be frustrating, especially if your site becomes unresponsive. This issue is particularly prevalent on shared hosting plans, where resources are distributed among multiple websites on the same server. Here are some steps to troubleshoot and resolve an unfinished WordPress update:
- Assessing the Update Status: First, check if the update is genuinely stuck. Open the Plugins panel in a new browser tab to see if the update has been completed but has yet to be reflected in the WordPress dashboard. Server delays can sometimes cause a lag in updating the dashboard status.
- Giving It Time: Patience can sometimes be key if the update needs to be finished. Wait a bit longer and then refresh the Plugins panel to see if the update has progressed. Updates, especially on shared servers, can take longer than expected.
- Update Plugins Individually: If you were attempting to update multiple plugins simultaneously and the process got stuck, try updating them one at a time. This reduces the load on the server and increases the likelihood of successful updates. It also helps in pinpointing if a specific plugin is causing the issue.
- Checking Server Resources: Resource limitations can hinder the update process on shared hosting. If possible, monitor your server’s resource usage during the update. If you consistently hit resource limits, consider upgrading your hosting plan or contacting your hosting provider for assistance.
- Troubleshooting Specific Plugins: If a particular plugin update is causing problems, try disabling it and then updating it separately. If the issue persists, seek an alternative plugin or contact the developer for support.
- Consulting Hosting Support: Your hosting provider’s support team can be a valuable resource if all else fails. They can provide insights into server performance issues or specific errors obstructing the update process.
By following these steps, you can troubleshoot and resolve issues with WordPress updates that aren’t complete.
How Do I Fix My WordPress Website if an Update Won't Finish?
When a WordPress update doesn’t complete, it can be frustrating, especially if your site becomes unresponsive. This issue is particularly prevalent on shared hosting plans, where resources are distributed among multiple websites on the same server. Here are some steps to troubleshoot and resolve an unfinished WordPress update:
- Assessing the Update Status: First, check if the update is genuinely stuck. Open the Plugins panel in a new browser tab to see if the update has been completed but has yet to be reflected in the WordPress dashboard. Server delays can sometimes cause a lag in updating the dashboard status.
- Giving It Time: Patience can sometimes be key if the update needs to be finished. Wait a bit longer and then refresh the Plugins panel to see if the update has progressed. Updates, especially on shared servers, can take longer than expected.
- Update Plugins Individually: If you were attempting to update multiple plugins simultaneously and the process got stuck, try updating them one at a time. This reduces the load on the server and increases the likelihood of successful updates. It also helps in pinpointing if a specific plugin is causing the issue.
- Checking Server Resources: Resource limitations can hinder the update process on shared hosting. If possible, monitor your server’s resource usage during the update. If you consistently hit resource limits, consider upgrading your hosting plan or contacting your hosting provider for assistance.
- Troubleshooting Specific Plugins: If a particular plugin update is causing problems, try disabling it and then updating it separately. If the issue persists, seek an alternative plugin or contact the developer for support.
- Consulting Hosting Support: Your hosting provider’s support team can be a valuable resource if all else fails. They can provide insights into server performance issues or specific errors obstructing the update process.
By following these steps, you can troubleshoot and resolve issues with WordPress updates that aren’t complete.
How Do I Fix WordPress's "White Screen of Death"?
The “white screen of death” (WSOD) is a common issue in WordPress, where your site displays a blank, white screen without any error message. This can be notably perplexing as it gives no clue about what went wrong. Here are steps to diagnose and fix the WSOD:
- Check for PHP or Database Errors: Often, the WSOD is caused by PHP errors or database issues. Access your website’s error logs through your hosting account to look for any recent error messages. If you find errors related to specific plugins or themes, that’s likely where the problem lies.
- Increase Memory Limit: Insufficient memory can lead to the WSOD. To increase the memory limit, edit the wp-config.php file by adding the line define(‘WP_MEMORY_LIMIT’, ’64M’);. If this doesn’t resolve the issue, the problem might not be due to memory.
- Deactivate Plugins and Themes: Since faulty plugins or themes are common culprits, try deactivating all plugins. If you can’t access your WordPress dashboard, use an FTP client to rename your plugins folder (found in wp-content/plugins). This deactivates all plugins. If this resolves the issue, reactivate each plugin one by one to identify the problematic plugin. Apply the same process to your themes by switching to a default WordPress theme.
- Enable Debugging: To get more information about the issue, enable debugging in WordPress. Edit the wp-config.php file and set define(‘WP_DEBUG’, true);. This will display any PHP errors on the white screen, which can guide you to the source of the problem.
- Check File Permissions: Incorrect file permissions can also cause the WSOD. Ensure that your files and folders have the correct permissions. Folders should be set to 755, and files should be set to 644.
- Consult with Hosting Provider: Contact your hosting provider if you need help with these steps. They can provide server-side insights and identify and fix the issue.
By methodically following these steps, you can diagnose and potentially fix the white screen of death, restoring your WordPress site to its functional state.
If All Else Fails, Restore from Your Backup
Updating and maintaining your WordPress site is crucial for its security, performance, and relevance. I hope this has helped you update your site yourself. Remember, staying current with WordPress updates is not just a maintenance task; it’s essential to ensure your website’s success and longevity.
If you’re looking for expert assistance in managing your WordPress site or want to elevate your web presence, feel free to contact us at Excel on the Web. We’re here to help you navigate the complexities of web development and ensure your site remains a robust, dynamic part of your business.